dpkg : Use dpkg to work with .deb files from CD-ROM or other disk storage.
The dpkg command has options for configuring, installing, and obtaining infor-
mation on system software.
aptitude : Use aptitude at the command line for working with online reposito-
ries. The aptitude tool is recommended as the first choice because it will automat-
ically take care of some of the tasks you must do manually when working with
dpkg or APT.
petak, 22. listopada 2010.
srijeda, 20. listopada 2010.
OpenOffice 3.3.0 RC 1
OpenOffice.org 3.3.0 RC 1
download from here http://download.openoffice.org/all_rc.html
Download and install OpenOffice.org to Ubuntu i386 with wget
Application > Accessories > Terminal:
user@desktop:-$ cd ~/Desktop
user@desktop:~/Desktop$ wget http://openoffice.mirrorbrain.org/files/extended/3.3.0rc1/OOo_3.3.0rc1_20101015_Linux_x86_install-deb_en-US.tar.gz
user@desktop:~/Desktop$ tar xvzf OOo_3.3.0rc1_20101015_Linux_x86_install-deb_en-US.tar.gz
Install to Ubuntu 10.04, 10.10:
user@desktop:$ cd ~/Desktop
user@desktop:$ cd /home/USERNAME/Desktop/OOO330_m11_native_packed-1_en-US.9535/DEBS
your USERNAME
user@desktop:~/Desktop/OOO330_m11_native_packed-1_en-US.9535/DEBS$ sudo dpkg -i *.deb
user@desktop:~/Desktop/OOO330_m11_native_packed-1_en-US.9535/DEBS$ cd /home/USERNAME/Desktop/OOO330_m11_native_packed-1_en-US.9535
user@desktop:~/Desktop/OOO330_m11_native_packed-1_en-US.9535$ sudo dpkg -i openoffice.org3.3-debian-menus_3.3-9533_all.deb
ponedjeljak, 18. listopada 2010.
dos2unix and unix2dos
dos2unix missing (Ubuntu 10.04)
"dos2unix" and "unix2dos" are missing in version 10.04 (Lucid).
First of all, install dos2unix package:
$ sudo aptitude install tofrodos
Then if you want "dos2unix" type "fromdos" and if you want "unix2dos", type "todos".
If you have a habit of typing in the old commands, its best to create links.
Go to /usr/bin:
username@desktop:~$ cd /usr/bin
username@desktop:/usr/bin# sudo ln -s fromdos dos2unix
username@desktop:/usr/bin# sudo ln -s todos unix2dos
nedjelja, 17. listopada 2010.
Few easy ways to secure Ubuntu
Few easy ways to secure Ubuntu 10.04
1. Account Locking
Account locking for multiple failed tries puts extra burden on the system administrators but it also puts some responsibility on the user to remember his passwords. Additionally, locking allows the administrator to track the accounts that have potential hack attempts against them and to notify those users to use very strong passwords.
Typically, a system will drop your connection after three unsuccessful attempts to login but you may reconnect and try again. By allowing an infinite number of failed attempts, you’re compromising your system’s security. Smart system administrators can take the following measure to stop this threat: Account lockout after a set number of attempts. My preference is to set that limit to three.
Add the following lines to your system’s /etc/pam.d/system-auth file.
auth required /lib/security/$ISA/pam_tally.so onerr=fail no_magic_root
account required /lib/security/$ISA/pam_tally.so per_user deny=3 no_magic_root reset
Your distribution might not include the system-auth file but instead uses the /etc/pam.d/login file for these entries.
2. Cron Restriction
On multiuser systems, you should restrict cron and at to root only. If other users must have access to scheduling, add them individually to the $ sudo gedit /etc/cron.allow and $ sudo gedit /etc/at.allow files. If you choose to create these files and add user accounts into them, you also need to create $ sudo gedit /etc/cron.deny and $ sudo gedit /etc/at.deny files. You can leave them empty but they need to exist. Don’t create an empty /etc/cron.deny unless you add entries to the /etc/cron.allow because doing so allows global access to cron. Same goes for at.
To use the allow files, create them in the /etc directory and add one user per line to the file. The root user should have an entry in both allow files. Doing this restricts cron to the root user only.
As the system administrator, you can allow or deny cron and at usage based upon the user’s knowledge and responsibility levels.
3. Deny, Deny, Deny
System security experts recommend denying all services for all hosts using an all encompassing deny rule in the $ sudo gedit /etc/hosts.deny file. The following simple entry (ALL: ALL) gives you the security blanket you need.
#
# hosts.deny This file describes the names of the hosts which are
# *not* allowed to use the local INET services, as decided
# by the '/usr/sbin/tcpd' server.
#
# The portmap line is redundant, but it is left to remind you that
# the new secure portmap uses hosts.deny and hosts.allow. In particular
# you should know that NFS uses portmap!
ALL: ALL
Edit the $ sudo gedit /etc/hosts.allow file and insert your network addresses (192.168.1., for example) where you and your users connect from before you logout or you’ll have to login via the console to correct the problem. Insert entries similar to the following to allow access for an entire network, single host or domain. You can add as many exceptions as you need. The /etc/hosts.allow file takes precedence over the /etc/hosts.deny to process your exceptions.
4. Deny SSH by Root
Removing the root user’s ability to SSH provides indirect system security. Logging in as root to a system removes your ability to see who ran privileged commands on your systems. All users should SSH to a system using their standard user accounts and then issue su or sudo commands for proper tracking via system logs.
Open the $ sudo gedit /etc/ssh/sshd_config file with your favorite editor and change PermitRootLogin yes to PermitRootLogin no and restart the ssh service to accept the change.
$ sudo /etc/init.d/ssh restart
5. Change the Default Port
While changing the default SSH port (22) will have limited effectiveness in a full port sweep, it will thwart those who focus on specific or traditional service ports. Some sources suggest changing the default port to a number greater than 1024, for example: 2022, 9922 or something more random, such as 2345. If you’re going to use this method as one of your strategies, I suggest that you use a port that doesn’t include the number 22.
Edit your $ sudo gedit /etc/ssh/sshd_config and change the “Port” parameter to your preferred port number. Uncomment the Port line too. Restart the sshd service when you’re finished and inform your users of the change. Update any applicable firewall rules to reflect the change too.
$ sudo /etc/init.d/ssh restart
petak, 15. listopada 2010.
Atheros AR 5001 on Fujitsu Siemens Amilo 1718 , Ubuntu 10.04
Wireless on Lucid - Fujitsu Siemens Amilo 1718
To get the new Ubuntu 10.04 Lucid Lynx working do the following
1. download http://homepage.ntlworld.com/roadrash/lucid/fsam7400-0.5.2.tbz to your home folder
a@a:~$ cd ~/Desktop
a@a:~/Desktop$ wget http://homepage.ntlworld.com/roadrash/lucid/fsam7400-0.5.2.tbz
2. extract the tarball
now open a terminal and enter the following
$ cd fsam7400-0.5.2
$ sudo make
$ sudo make install
$ sudo modprobe fsam7400
$ sudo gedit /etc/modules
and add fsam7400 to the next line and then save & reboot
fsam7400
četvrtak, 14. listopada 2010.
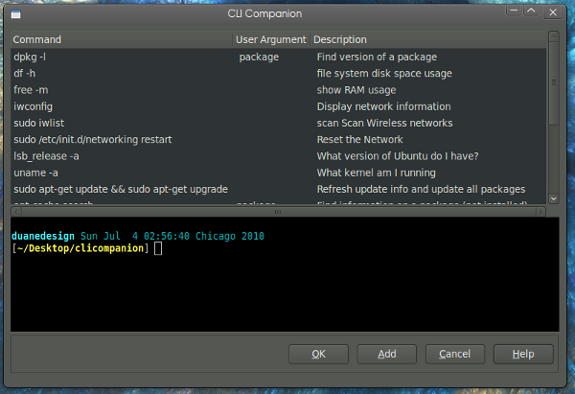
CLIcompanion
CLI Companion is an application that is used as a compliment to the Linux Terminal. People unfamiliar with the terminal will find CLIcompanion useful to become acquainted with the terminal. Using the built-in commands you can unlock the potential of the Terminal. Experienced users can use CLIcompanion's add command feature to build a command dictionary. Store commands as you come across them and no more do you have to search for them.

Applications > Accessories > Terminal;
$ cd ~/Downloads
a@a:~/Downloads$
To get the deb:
a@a:~/Downloads$ wget http://launchpad.net/clicompanion/1.0/1.0rc/+download/clicompanion_1.0-2_all.deb
To install the deb:
$ cd ~/Downloads
a@a:~/Downloads$ sudo dpkg -i clicompanion_1.0-2_all.deb
http://okiebuntu.homelinux.com/okwiki/clicompanion/
srijeda, 13. listopada 2010.
Banshee is an open-source media player, originally called Sonance until 2005
Banshee
Built upon Mono and Gtk#, it uses the Helix and GStreamer multimedia platform for encoding and decoding various media formats, including Ogg Vorbis, MP3 and FLAC. Banshee can play and import audio CDs and supports many portable media players, including Apple’s iPod, Android devices and Creative’s ZEN players.
Other features include Last.fm integration, album artwork fetching, smart playlists and podcast support. Banshee is released under the terms of the MIT License and is available for Linux as well as Mac OS X operating systems.
---------------------------------------------
Install latest version of banshee music player in ubuntu 10.10/10.04/9.10
Applications > Accessories > Terminal:
$ sudo add-apt-repository ppa:banshee-team/ppa
$ sudo apt-get update
$ sudo apt-get install banshee
---------------------------------------------
web:
http://banshee.fm/
ponedjeljak, 11. listopada 2010.
Ubuntu Tweak 0.5.1 in Ubuntu 10.04 Lucid
Ubuntu Tweak is an application to config Ubuntu easier for everyone.
It provides many useful desktop and system options that the default desktop environment doesn't provide.
With its help, you will enjoy with the experience of Ubuntu!
How to install:
Applications > Accessories > Terminal:
$ sudo add-apt-repository ppa:tualatrix/ppa
$ sudo apt-get update
$ sudo apt-get install ubuntu-tweak
http://ubuntu-tweak.com/
nedjelja, 10. listopada 2010.
Simple Backup
Simple Backup Stable Repository PPA
$ sudo gedit /etc/apt/sources.list
# Simple Backup Stable Repository PPA
deb http://ppa.launchpad.net/nssbackup-team/ppa/ubuntu lucid main
deb-src http://ppa.launchpad.net/nssbackup-team/ppa/ubuntu lucid main
$ sudo apt-key adv --keyserver keyserver.ubuntu.com --recv-keys D1C0D905
$ sudo apt-get update
$ sudo apt-get install nssbackup
Ubuntu 10.04 Lucid
https://help.ubuntu.com/community/BackupYourSystem/SimpleBackupSuite
subota, 9. listopada 2010.
Rootkit Hunter - rkhunter - scans files and systems rootkits, backdoors, sniffers, and malware
Rootkit Hunter - rkhunter
Rootkit Hunter scans files and systems for known and unknown rootkits, backdoors, sniffers, and malware. The application consists of the main shell script, a few text-based databases, and optional Perl scripts. It can recognise and run external applications like 'skdet' and 'unhide'. It should run on almost every Unix clone.
$ sudo aptitude install rkhunter
After install run tis comand:
$ sudo rkhunter --checkall
web:
http://rkhunter.sourceforge.net/
http://www.rootkit.nl/projects/rootkit_hunter.html
petak, 8. listopada 2010.
Root nautilus
How to Root nautilus on Ubuntu
Go to the Gnome Panel, and right click on it:
1. - Add to Panel...
 Then click:
2. - Custom Application Launcher
 Now write :
3.a. - Name: Root nautilus
3.b. - Command: gksudo nautilus
3.c. - Comment: Root nautilus

Go to the Gnome Panel, and right click on it:
1. - Add to Panel...

2. - Custom Application Launcher

3.a. - Name: Root nautilus
3.b. - Command: gksudo nautilus
3.c. - Comment: Root nautilus

četvrtak, 7. listopada 2010.
Cleaning Up Packages with APT
Cleaning Up Packages with APT
$ find /var/cache/apt/ -name \*.deb
$ sudo apt-get clean
$ find /var/cache/apt/ -name \*.deb
$ find /var/cache/apt/ -name \*.deb
$ sudo apt-get clean
$ find /var/cache/apt/ -name \*.deb
srijeda, 6. listopada 2010.
Gnome-dictionary work offline
Gnome-dictionary work offline
Applications > Accessories > Terminal:
$ sudo apt-get install dictd dict-gcide
$ sudo apt-get install dict-moby-thesaurus
Configure the dictd server to connect to localhost and not dict.org.
Open the gnome-dictionary, go to
Edit -> Preferences,
add a new source and change the server to "127.0.0.1"
Use gnome-dictionary offline.
If it doesn't work then try restarting the application or the server itself.
$ sudo service dictd restart
utorak, 5. listopada 2010.
Managing Software with APT
Managing Software with APT
$ sudo apt-get update
Consults /etc/apt/sources.list and updates the database of available packages.
$ sudo apt-get upgrade
Check updates for all installed packages and then prompt to download and install them.
$ sudo apt-get dist-upgrade
Updates the entire system to a new release, even if it means removing packages.
$ sudo apt-get clean
Removes all cached packages from /var/cache/apt/archives to free up disk space.
$ sudo apt-get autoclean
Can be run anytime to delete partially downloaded packages, or packages no longer installed.
$ sudo apt-get install "package"
Download and install the given package name as found in the package database.
$ sudo apt-get -d install "package"
Download the package only, placing it in /var/cache/apt/archives.
$ sudo apt-cache search "keyword"
Case-insensitive search of the package database for the keyword given. The package names and descriptions are returned where that keyword is found.
$ apt-cache show "package"
Display information about the software from the named package.
$ sudo apt-cache depends
Print dependencies for a package.
$ sudo apt-key list
List gpg keys that APT knows about.
$ sudo apt-cache pkgnames
List all packages installed on the system.
$ sudo apt-get --purge remove "package"
Remove the named package and all its configuration files. Remove the --purge keyword to keep config files.
$ sudo apt-get -f install
Do a sanity check for broken packages.
$ sudo apt-config -V
Print version information of installed APT utilities.
$ sudo apt-cache stats
Print statistics on all packages installed.
ponedjeljak, 4. listopada 2010.
GNOME Icon Theme - Faenza, AwOken, Elegant GNOME
================================
Faenza
GNOME Icon Theme
Applications > Accessories > Terminal:
$ sudo add-apt-repository ppa:tiheum/equinox
$ sudo apt-get update && sudo apt-get install faenza-icon-theme
================================
AwOken - Awesome Token icon set
GNOME Icon Theme
Applications > Accessories > Terminal:
$ sudo add-apt-repository ppa:alecive/antigone && sudo apt-get update
$ sudo apt-get install awoken-icon-theme
================================
Elegant GNOME icon set
GNOME Icon Theme
Ubuntu 10.04 Lucid
Applications > Accessories > Terminal:
$ sudo gedit /etc/apt/sources.list
# Elegant GNOME PPA Ubuntu 10.04 lucid
deb http://ppa.launchpad.net/elegant-gnome/ppa/ubuntu lucid main
deb-src http://ppa.launchpad.net/elegant-gnome/ppa/ubuntu lucid main
$ sudo apt-key adv --keyserver keyserver.ubuntu.com --recv-keys 17CF995E
$ sudo apt-get update
$ sudo apt-get install gtk2-engines-murrine elegant-gnome
================================
Elegant GNOME icon set
GNOME Icon Theme
Ubuntu 10.10 Maverick
Applications > Accessories > Terminal:
$ sudo gedit /etc/apt/sources.list
# Elegant GNOME PPA Ubuntu 10.10 Maverick
deb http://ppa.launchpad.net/elegant-gnome/ppa/ubuntu maverick main
deb-src http://ppa.launchpad.net/elegant-gnome/ppa/ubuntu maverick main
$ sudo apt-key adv --keyserver keyserver.ubuntu.com --recv-keys 17CF995E
$ sudo apt-get update
$ sudo apt-get install gtk2-engines-murrine elegant-gnome
================================
nedjelja, 3. listopada 2010.
byobu
Byobu is a Japanese term for decorative, multi-panel screens that serve as folding room dividers. As an open source project, Byobu is an elegant enhancement of the otherwise functional, plain, practical GNU Screen. Byobu includes an enhanced profile and configuration utilities for the GNU screen window manager, such as toggle-able system status notifications.
How to install Ubuntu 10.04
Applications > Accessories > Terminal:
$ sudo apt-key adv --keyserver keyserver.ubuntu.com --recv-keys F430BBA5
$ sudo add-apt-repository ppa:byobu/ppa
$ sudo apt-get update
$ sudo apt-get install byobu
How to install Ubuntu 10.04
Applications > Accessories > Terminal:
$ sudo apt-key adv --keyserver keyserver.ubuntu.com --recv-keys F430BBA5
$ sudo add-apt-repository ppa:byobu/ppa
$ sudo apt-get update
$ sudo apt-get install byobu
subota, 2. listopada 2010.
XBMC - Media Center
XBMC is an award-winning free and open source (GPL) software media player and entertainment hub for digital media. XBMC is available for Linux, OSX, Windows, and the original Xbox
-----------
HOW-TO install XBMC for Linux on Ubuntu 10.04 lucid
Appliciation > Accessories > Terminal:
$ sudo add-apt-repository ppa:team-xbmc
$ sudo apt-get update
$ sudo apt-get install xbmc
$ sudo apt-get update
-----------
or
-----------
$ sudo gedit /etc/apt/sources.list
# XBMC
deb http://ppa.launchpad.net/team-xbmc/ppa/ubuntu lucid main
deb-src http://ppa.launchpad.net/team-xbmc/ppa/ubuntu lucid main
$ sudo apt-key adv --recv-keys --keyserver keyserver.ubuntu.com 0x6d975c4791e7ee5e
$ sudo apt-get update
$ sudo apt-get install xbmc xbmc-standalone
-----------
web:
http://xbmc.org
http://wiki.xbmc.org/index.php?title=HOW-TO_install_XBMC_for_Linux_on_Ubuntu,_a_Step-by-Step_Guide
-----------
HOW-TO install XBMC for Linux on Ubuntu 10.04 lucid
Appliciation > Accessories > Terminal:
$ sudo add-apt-repository ppa:team-xbmc
$ sudo apt-get update
$ sudo apt-get install xbmc
$ sudo apt-get update
-----------
or
-----------
$ sudo gedit /etc/apt/sources.list
# XBMC
deb http://ppa.launchpad.net/team-xbmc/ppa/ubuntu lucid main
deb-src http://ppa.launchpad.net/team-xbmc/ppa/ubuntu lucid main
$ sudo apt-key adv --recv-keys --keyserver keyserver.ubuntu.com 0x6d975c4791e7ee5e
$ sudo apt-get update
$ sudo apt-get install xbmc xbmc-standalone
-----------
web:
http://xbmc.org
http://wiki.xbmc.org/index.php?title=HOW-TO_install_XBMC_for_Linux_on_Ubuntu,_a_Step-by-Step_Guide
petak, 1. listopada 2010.
qmmp audio-player very similar to winamp
This program is an audio-player.
The program has user interface, similar to winamp or xmms.
Supported formats:
MPEG1 layer 2/3
Ogg Vorbis
Native FLAC, Ogg FLAC
Musepack
WavePack
Tracker modules (mod, s3m, it, xm, etc)
ADTS AAC
CD Audio
WMA, Monkey's Audio (and other formats provided by FFmpeg library)
PCM WAVE (and other formats provided by libsndfile library)
-----------------------------------
How to install on Ubuntu 10.04:
Applications > Ubuntu Software Center > qmmp
or
$ sudo aptitude install qmmp qmmp-plugin-projectm
-----------------------------------
http://code.google.com/p/qmmp/
Pretplati se na:
Postovi (Atom)